don’t throw your hat up in the air

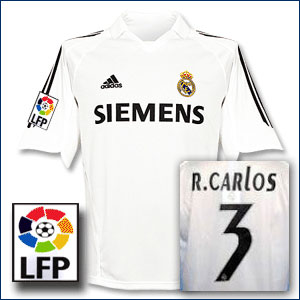
I don’t follow La Liga much, but I did notice Real Madrid are using a different font for their names and numbers this year:

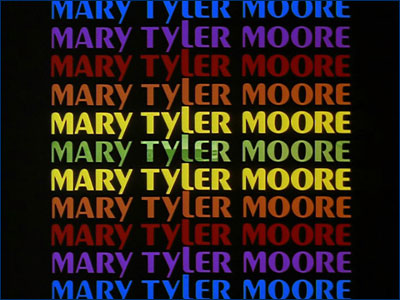
That font just sings to me…in fact, it sings a very specific song:*

Who can turn the world on with her smile?
Who can take a nothing day, and suddenly make it all seem worthwhile?
Well it’s you, girl, and you should know it
With each glance and every little movement you show it
Love is all around, no need to waste it
You can have a town, why don’t you take it
You’re gonna make it after all

*The H&#252sker D&#252 version.

Posted in goofy |

Camel City Bomb Squad

Magpie’s design and painting, my slogan. Way the hell back in the day, Camel City Bomb Squad was the name given to a punk collective that’d put on shows and stuff in whatever the all-ages club of the week was on 6th Street in Winston-Salem, where I grew up and where Wake Forest University is located. Upon hearing that the Revs’ first two draft picks this year came out of Wake, I suggested we borrow the CCBS appellation to describe them. Turns out a shout-out banner was a pretty good idea, because while Riley’s had his ups and downs, Parkhurst (knock on wood) has been tremendous, playing like he’s been in the squad forever. Finished size is 5’x15′.

In late May, the team hosted a meet and greet event for season ticket holders. I went up to Riley and Parkhurst’s table to say hi and let them know how that banner came to be. Parkhurst excitedly explained that he was using a photo of the banner as his computer’s desktop image. To date, that’s the coolest complement about these things I’ve heard.

Posted in finished projects, revs |

How we do it: design and tracing

(No photos for this one, sorry)

All the banners we’ve done to date have first been designed on computer, largely in Photoshop. The ones produced for the 2005 season were all developed over the winter 2004-05 offseason, frequently with the two of us sending each other mockups during early Saturday morning English Premier League games. (It helped that neither of our favorite EPL teams exactly played many games worth watching that season). I’ve gotten awfully adept at tracing the Nike Total 90 jersey template onto cartoon characters using just an index finger on a laptop trackpad. Once the final designs were settled, however, we were still left with the question of how to get the designs onto the fabric.

The Cartman banner was done freehand, and that was simple enough to do. But the banners we’d just run up all required specific fonts or relatively complex illustrations. Magpie came real close to investing in an opaque projector, until another friend of ours volunteered the space and overhead projectors available at his school classroom on the weekends. All we had to do was print the banner designs onto transparencies, tack the finished fabric onto the walls, and we were set. We used Sharpie markers to trace the designs, because chalk outlines would’ve rubbed off before we got the chance to paint them. The fabric had also all been cut and finished to match the proportions of the banner designs…mostly. Turned out that the Gorillaz one was a bit too large, so we just added a second tagger at the end of the banner.

Since sewing and tracing are the least exciting steps in banner construction, we did them in batches–everything sewn at once, then everything traced at once. Since the facilities we were using for tracing required a trip to Maine, it was important we get as much done in one step as possible. It was easy enough to handle painting as time, weather, and space permitted, although we probably would’ve gotten the larger banners done sooner had my driveway not been covered in snow well into March. We’ve done one more sewing and tracing run recently, and for the next round it’s likely we won’t have the same classroom setup available. If that’s the case, we may just skip the printed transparency step and just run everything through an LCD projector. Admittedly, it’s a pretty fancy setup for goofy signs to hang at soccer games, but when you’re as obsessive about design detail as we are, it’s worth the hassle.

Posted in nuts and bolts |

nerd alert

This caught my eye in December, and ever since I’ve wondered if it’s the same guy. When asked, the guy who runs Anime on DVD gave a vague answer.

Posted in goofy, revs |

How we do it: sewing

I do all the sewing for the banners. Not very well, if you happen to see the backsides of them, but I’m the one with the sewing machine. It’s easier to do all the sewing, including hardware installation, before painting, so you know what the completed size will be. Everything gets hemmed, with half-assed mitered corners. For the Cartman banner, the hanging hardware was grommets, twine, s-hooks, and jump rings; not only was this a tremendous hassle to assemble, but it also makes for difficulty folding and unfolding the banner when the s-hooks get tangled in themselves. There had to be a better way, and so, in the off-season, I gave each banner a different system of hanging straps. All had straps made of the same fabric as the banner itself, but with different fasteners:

The Ramones banner had silver metal shank buttons, which was largely a stylistic decision. JMM got white buttons, but I quickly decided I wasn’t really interested in sewing buttonholes on any banner wider than about six feet. The Camel City one got velcro tabs, which were tricky to sew and have turned out not to be as strong as I would like. Reis Has a Posse is held together by sew-in snaps, which, like the buttons, involved too much fiddling with hand sewing to be practical. Both Spongebob and the Gorillaz one used heavy-duty snaps, set with pliers. This option turned out to be the winner, once I got the hang of setting in the snaps, as it’s both relatively quick to do and results in a pretty strong hold that’s easily set up and torn down at a match. Subsequent banners have all had snap fasteners.

Posted in nuts and bolts |

How we do it: fabrics

After nylon and fabric paint for the Cartman banner proved way more expensive than we could really justify, part of the off-season was spent testing different fabric and paint combinations to see what would work best. Would a poly-based poplin work? Should we use cotton canvas, which, while inexpensive and easy to paint, is heavy and holds water like a sponge? Which paints should we use–dedicated fabric paints or just regular latex housepaint? For paint, we needed something available in a variety of colors and that would withstand a fair amount of abuse from being rained on, stuffed in a bag, stepped on, etc. For fabric, we needed something that would be inexpensive and could hold paint in the same tough conditions.

Using three fabric swatches–two polyester blends and one cotton canvas–and four types of paint (two types of fabric paint, craft acrylic mixed with fabric paint medium, and latex housepaint), I conducted a test. I used white and peach for the paint samples, partly because those were what I had on hand and partly because lighter colors are harder to use against a dark background. The fabric samples were all dark blue, which, as a main color for both the Revolution and the US national team, would be first choice for several banner designs. Each swatch got two coats of each type of paint, then ironed to set the colors as per the fabric paint instructions, and then washed and dried in a regular high heat cycle with my usual laundry.

The first poly sample:

The second poly sample:

The first cotton sample:

Ultimately, all of the paint and fabric combinations held up relatively well, with some of the fabric paints flaking off after a washing. With this in mind, we decided the best combination was latex housepaint on cotton canvas. For both the paint and the fabric, it came down to what would offer the widest variety of options for the least amount of money. Had we chosen fabric paints and a more expensive fabric, we wouldn’t have been able to do nearly the work we were able to do for the money–all eight banners we had finished by the beginning of April only cost slightly more, including all supplies, than the Cartman banner did. The weight and waterlogging of the canvas wasn’t enough to cancel out its availability, versatility, and ease of use. We decided all we needed was for something to last for a season; if they stuck around longer, great, but just enough to get us eighteen games from April to October would deliver the right return on investment.

We did, however, lose two banners. The two supporters’ club crests were painted using latex housepaint, but not on canvas–they were done on bedsheets, which we both thought would be a convenient way of getting finished fabric in the right size and color for a decent price. Unfortunately, the fabric and the paint just didn’t get along together, and after the miserably rainy game against Chivas on April 30, I took home a bag of wet fabric with paint that had run too much to be salvageable. This taught us another important lesson: Prior to the next home game, vs. Chicago, we called and asked stadium operations not to set out the banners because the forecast predicted (and delivered) another rainy day.
Posted in nuts and bolts |

Release the Hounds

I was inspired to do this one as I saw a woman walking her greyhounds across the street while I was coming back from a paint run for the Cartman banner. If I had to do it again, I’d make the text a little less narrow, but it does read well enough at a distance. I’ve always felt that the 1994 World Cup mascot was the best one ever in terms of matching national identity to a cartoon character, even better than 1966’s World Cup Willie, so I thought it’d be fun to bring him back in a current kit. Done just in time for the Gold Cup in July of 2005, and Striker is wearing #14–Steve Ralston’s number during recent World Cup qualifiers (though he tended to wear 19 during the Gold Cup). Finished size is 5’x18′.

Posted in finished projects, nats |

Joe-Max Moore tribute

When Joe-Max Moore announced his retirement, the suggestion of doing a tribute banner immediately popped up. I did this one in two hours in March, all with one brush, using a dry brush technique and fabric paint to get the shadow and contrast. Then it sat in a bin in my kitchen for four months waiting until a date for an official matchday tribute to the guy posted. It went over pretty well. It was also supposed to go home with him after the game as a gift, but was instead nearly stolen by a couple of idiot teenage girls after the evening’s match; it was given to him in care of the team later. Finished size is 4’x6′.

Posted in finished projects, revs |

Midnight Riders and Rev Army crests

These are the crests for the two main Revolution independent supporters’ clubs. Originally, Magpie painted them on red bedsheets in his apartment over the winter:

Unfortunately, the early season here in New England was terribly rainy, and these two banners drowned during the Chivas game in late April. It’s a shame, because they looked great against the red backgrounds. When I got a chance, I tried again on white canvas, fabric I knew would hold the paint in the rain. Finished size on both is 6’x6′.

Posted in finished projects, revs |

You Fat Bastard

Talk amongst yourselves…

The Goalie.... and one fat bastard.

Posted in finished projects, revs |